| Word automation using C# |
|
| Written by Zack MIlls |
| Friday, 08 October 2010 05:37 |
|
http://www.e-iceblue.com/Knowledgebase/Spire.Doc/Demos/Convertors.html
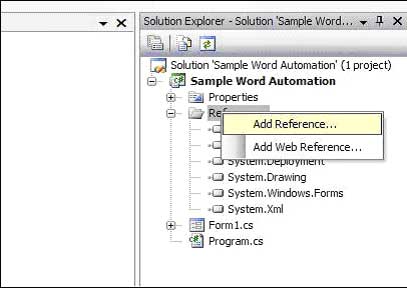
1. Development Tools Used Microsoft Word 2003 Programming Language: C# Word Automation through C# is all about programmatically generating the Word Document using C# code. Working on Word is considered to be straightforward, but doing the same programmatically gets a little intricate. Word automation almost completely involves working with objects and reference types. Almost all of the tasks which we perform on word 2003 can be done programmatically using C# or VB. Tasks like Inserting Table of Contents, Linking documents, Mail Merge, Inserting Documents, Embedding documents, inserting pictures, watermark... etc can all be done programmatically. Starting off, the first step is to include the Word dll's to the Solution. This can be done by right clicking the Reference Folder in the Solution explorer of the project and select Add Reference.
Browse Through the available COM objects and Select Microsoft Office 11.0 Object Library & Microsoft Word 11.0 Object Library. This DLL has all the methods which we do to perform the automation.
Also include "using Microsoft.Office;" in the Namespaces used.
All the methods used Word automation is derived either from Word.Application or Word.Document class.
Let's consider that we want to create a document using the Word Application, we might end up doing the following steps,
The same steps needs to be done programmatically. The Word.Application and Word.Document are used to Open Word and add a new Document to it. This represents in Word Application without any new document loaded in it. This is like the base class which is needed to create a new document. Creating a new instance of Word.Application can be visualized as below.
4.2 Word.Document: If we need to add a new document file, first we have to create an instance of the Word.Document object and then add it to theWord.Application. Object oMissing = System.Reflection.Missing.Value(); //OBJECTS OF FALSE AND TRUE Object oTrue = true; Object oFalse = false;
//CREATING OBJECTS OF WORD AND DOCUMENT Word.Application oWord = new Word.Application(); Word.Document oWordDoc = new Word.Document();
//MAKING THE APPLICATION VISIBLE oWord.Visible = true;
//ADDING A NEW DOCUMENT TO THE APPLICATION oWordDoc = oWord.Documents.Add(ref oMissing, ref oMissing, ref oMissing, ref oMissing); This triggers the following operation in the Word Application
Approaches to Perform Automation
4.3 Standard Input Parameters: Most of the methods have input parameters which are of reference type, and the values are mostly true, false or missing (null). In automation it makes sense as to why most of the input parameters are of reference types; it might be because of the fact that most of the methods a multitude of input parameters (many have more than 10 input parameters) and their value is going to be either true, false or missing in most of the cases. So instead of supplying the same input parameter ten times, we can make all the input parameters point to the location same single variable in them memory. While we work on Word Application, if we want to type some text in the 11th line, then we manually take the cursor and click it on the required line and then start typing. In order to do the same task, we use the Range variable in C#. The range variable of theWord.Document object represents the location of the cursor on the current document. There are many possible ways to point to a specific location on a document. I had extensively used the Bookmarks locators as I work on Automation using a base template. In this approach, we insert Bookmarks on the base template and we programmatically locate those Bookmarks, set the range on them and insert text or documents at that specific location. There are also many other possible ways to set the range. Object oBookMarkName = "My_Inserted_Bookmark_On_Template"; Word.Range wrdRange = oWordDoc.Bookmarks.get_Item(ref oBookMarkName).Range.Select(); While working on word, we select a range of text by clicking and dragging the mouse pointer across contents in the document to select it. The contents can be text, formatted text, tables or any other item in the document. We programmatically represent the same by using the Selection Object derived from Word.Selection. In the previous range example, we locate a bookmark and set the range on that specific bookmark and we select it. Now the selection object represents that specific location. It's like placing the cursor on that specific bookmark location on the document. The selection across text can be done by selecting a range of text in between two ranges. Then the selected range can be copied, deleted or formatted. //BOOK MARK FOR START OF SELECTION Object oBookmarkStart = "BookMark__Start"; Object oRngoBookMarkStart = oWordDoc.Bookmarks.get_Item(ref oBookmarkDesignInfoStart).Range.Start;
//BOOK MARK FOR END OF SELECTION Object oBookmarkEnd = "BookMark__End"; Object oRngoBookMarkEnd = oWordDoc.Bookmarks.get_Item(ref oBookmarkDesignInfoEnd).Range.Start;
//SETTING THE RANGE ON THE BOOKMARK BETWEEN TWO BOOKMARKS Word.Range rngBKMarkSelection = oWordDoc.Range(ref oRngoBookMarkStart, ref oRngoBookMarkEnd);
//SELECTING THE TEXT rngBKMarkSelection.Select(); 5. Automation using a Base Template:
The base template file method is preferable as it gives us much more flexibility in performing the automation and it comes very handy for performing Mail Merge.
In the base template method, when we call the Documents.Add method of the Application object, we give the path of the .dot file. Object oTemplatePath = "C:\\Program Files\\MyTemplate.dot";
//ADDING A NEW DOCUMENT FROM A TEMPLATE oWordDoc = oWord.Documents.Add(ref oTemplatePath, ref oMissing, ref oMissing, ref oMissing);
Mail merge is a useful tool in scenarios where we want to randomly generate alike documents where just a few fields change. For instance in a pay slip which has a base template and just the employee name, number and pay details needs to change for each employee. Now we can have a base template which is a word file saved as Document Template file.
In the .dot file, insert a Mail Merge Field manually by placing the cursor in the required position and Insert -> Field, and in Field Names, select "MergeField", now the Mail merged field would be represented by <<FieldName>>. The template can be like
Contact Information
For further information and discussions, please contact: Name: <<CIFLName>> Address: <<CIAddress>> Phone: <<CIPhW>> (Work) <<CIPhM>> (Cell) Fax: <<CIFax>> Email <<CIMail>> Now for programmatically replacing the Mail Merge fields using the code, the document by default has many fields in it. But the user entered fields comes with a prefix and suffix which can be can be used as an identifier to replace the fields. Object oMissing = System.Reflection.Missing.Value();
//OBJECTS OF FALSE AND TRUE Object oTrue = true; Object oFalse = false;
//CREATING OBJECTS OF WORD AND DOCUMENT Word.Application oWord = new Word.Application(); Word.Document oWordDoc = new Word.Document();
//SETTING THE VISIBILITY TO TRUE oWord.Visible = true;
//THE LOCATION OF THE TEMPLATE FILE ON THE MACHINE Object oTemplatePath = "C:\\Program Files\\MyTemplate.dot";
//ADDING A NEW DOCUMENT FROM A TEMPLATE oWordDoc = oWord.Documents.Add(ref oTemplatePath, ref oMissing, ref oMissing, ref oMissing);
foreach (Word.Field myMergeField in oWordDoc.Fields) { iTotalFields++; Word.Range rngFieldCode = myMergeField.Code; String fieldText = rngFieldCode.Text;
// ONLY GETTING THE MAILMERGE FIELDS if (fieldText.StartsWith(" MERGEFIELD")) { // THE TEXT COMES IN THE FORMAT OF // MERGEFIELD MyFieldName \\* MERGEFORMAT // THIS HAS TO BE EDITED TO GET ONLY THE FIELDNAME "MyFieldName" Int32 endMerge = fieldText.IndexOf("\\"); Int32 fieldNameLength = fieldText.Length - endMerge; String fieldName = fieldText.Substring(11, endMerge - 11);
// GIVES THE FIELDNAMES AS THE USER HAD ENTERED IN .dot FILE fieldName = fieldName.Trim();
// **** FIELD REPLACEMENT IMPLEMENTATION GOES HERE ****// // THE PROGRAMMER CAN HAVE HIS OWN IMPLEMENTATIONS HERE if (fieldName == "MyField") { myMergeField.Select(); oWord.Selection.TypeText("This Text Replaces the Field in the Template"); } } }
There is one other method for replacing the Merge Fields which is mentioned in msdn, which uses a rather memory hungry approach. In that method a separate document is opened and it is inserted with a table which has first row as the Mail Merge Field Name and the second row as the replacement value, then the value from the table is matched with that of the original document and replacement occurs and the second document is purged.
Embedding a document is done through the application by Insert-> Object-> Create from file-> Select the File-> Display as Icon. This embeds the file in the selected location as an icon and the user can double click on the icon to open the file. The same can be done through automation. The range supposed to set at the required place and the same has to be selected (range can be set by any of the means mentioned above). Now with the selection, the file can be embedded. //ITS THE NAME DISPLAYED BESIDES THE EMBEDDED DOCUMENT Object oIconLabel = "File Name";
//INCASE WE NEED THE EMBEDDED DOCUMENT TO BE DISPLAYED AS A SPECIFIC ICON, //WE NEED TO SPECIFY THE LOCATION OF THE ICON FILE //ELSE SET IT TO oMissing VALUE Object oIconFileName = "C:\\Document and Settings\\IconFile.ico";
//THE BOOKMARK WHERE THE FILE NEEDS TO BE EMBEDDED Object oBookMark = "My_Custom_BookMark"; //THE LOCATION OF THE FILE Object oFileDesignInfo = "C:\\Document and Settings\\somefile.doc";
//OTHER VARIABLES Object oClassType = "Word.Document.8"; Object oTrue = true; Object oFalse = false; Object oMissing = System.Reflection.Missing.Value;
//METHOD TO EMBED THE DOCUMENT oWordDoc.Bookmarks.get_Item(ref oBookMark).Range.InlineShapes.AddOLEObject( ref oClassType,ref oFileDesignInfo,ref oFalse, ref oTrue, ref oIconFileName, ref oMissing,ref oIconLabel, ref oMissing); Contents of a Word documents can also be inserted into the current document from the application by doing the following.
Insert -> File -> Select the File. This extracts the contents from the selected file and inserts it into the current document.
In automation, we need to follow a similar approach by placing the range at the required point and selecting it and then inserting the file. String oFilePath = "C:\\Document and Settings\\somefile.doc"; oWordDoc.Bookmarks.get_Item(ref oBookMark).Range.InsertFile(oFilePath,ref oMissing, ref oFalse, ref oFalse, ref oFalse);
Including watermarks is one other important feature for any official documents as the watermark may have the company's logo, draft logo or any other picture/text. This is useful when we want a picture or some text to be present throughout the document in the background. We insert a watermark in the application by performing the following tasks.
Format -> Background -> Printed Watermarks
The same can also be done programmatically; moreover as we manually define the values like the angle of tilt and actual location of the watermark, we have more flexibility in defining the exact location of the watermark.
//EMBEDDING LOGOS IN THE DOCUMENT //SETTING FOCUES ON THE PAGE HEADER TO EMBED THE WATERMARK oWord.ActiveWindow.ActivePane.View.SeekView = Word.WdSeekView.wdSeekCurrentPageHeader;
//THE LOGO IS ASSIGNED TO A SHAPE OBJECT SO THAT WE CAN USE ALL THE //SHAPE FORMATTING OPTIONS PRESENT FOR THE SHAPE OBJECT Word.Shape logoCustom = null;
//THE PATH OF THE LOGO FILE TO BE EMBEDDED IN THE HEADER String logoPath = "C:\\Document and Settings\\MyLogo.jpg"; logoCustom = oWord.Selection.HeaderFooter.Shapes.AddPicture(logoPath, ref oFalse, ref oTrue, ref oMissing, ref oMissing, ref oMissing, ref oMissing, ref oMissing);
logoCustom.Select(ref oMissing); logoCustom.Name = "CustomLogo"; logoCustom.Left = (float)Word.WdShapePosition.wdShapeLeft;
//SETTING FOCUES BACK TO DOCUMENT oWord.ActiveWindow.ActivePane.View.SeekView = Word.WdSeekView.wdSeekMainDocument;
//THE LOGO IS ASSIGNED TO A SHAPE OBJECT SO THAT WE CAN USE ALL THE //SHAPE FORMATTING OPTIONS PRESENT FOR THE SHAPE OBJECT Word.Shape logoWatermark = null;
//INCLUDING THE TEXT WATER MARK TO THE DOCUMENT logoWatermark = oWord.Selection.HeaderFooter.Shapes.AddTextEffect( Microsoft.Office.Core.MsoPresetTextEffect.msoTextEffect1, "Enter The Text Here", "Arial", (float)60, Microsoft.Office.Core.MsoTriState.msoTrue, Microsoft.Office.Core.MsoTriState.msoFalse, 0, 0, ref oMissing); logoWatermark.Select(ref oMissing); logoWatermark.Fill.Visible = Microsoft.Office.Core.MsoTriState.msoTrue; logoWatermark.Line.Visible = Microsoft.Office.Core.MsoTriState.msoFalse; logoWatermark.Fill.Solid(); logoWatermark.Fill.ForeColor.RGB = (Int32)Word.WdColor.wdColorGray30; logoWatermark.RelativeHorizontalPosition = Word.WdRelativeHorizontalPosition.wdRelativeHorizontalPositionMargin; logoWatermark.RelativeVerticalPosition = Word.WdRelativeVerticalPosition.wdRelativeVerticalPositionMargin; logoWatermark.Left = (float)Word.WdShapePosition.wdShapeCenter; logoWatermark.Top = (float)Word.WdShapePosition.wdShapeCenter; logoWatermark.Height = oWord.InchesToPoints(2.4f); logoWatermark.Width = oWord.InchesToPoints(6f);
//SETTING FOCUES BACK TO DOCUMENT oWord.ActiveWindow.ActivePane.View.SeekView = Word.WdSeekView.wdSeekMainDocument; //INSERTING TEXT IN THE CENTRE RIGHT, TILTED AT 90 DEGREES Word.Shape midRightText; midRightText = oWord.Selection.HeaderFooter.Shapes.AddTextEffect( Microsoft.Office.Core.MsoPresetTextEffect.msoTextEffect1, "Text Goes Here", "Arial", (float)10, Microsoft.Office.Core.MsoTriState.msoTrue, Microsoft.Office.Core.MsoTriState.msoFalse, 0, 0, ref oMissing);
//FORMATTING THE SECURITY CLASSIFICATION TEXT midRightText.Select(ref oMissing); midRightText.Name = "PowerPlusWaterMarkObject2"; midRightText.Fill.Visible = Microsoft.Office.Core.MsoTriState.msoTrue; midRightText.Line.Visible = Microsoft.Office.Core.MsoTriState.msoFalse; midRightText.Fill.Solid(); midRightText.Fill.ForeColor.RGB = (int)Word.WdColor.wdColorGray375;
//MAKING THE TEXT VERTICAL & ALIGNING midRightText.Rotation = (float)90; midRightText.RelativeHorizontalPosition = Word.WdRelativeHorizontalPosition.wdRelativeHorizontalPositionMargin; midRightText.RelativeVerticalPosition = Word.WdRelativeVerticalPosition.wdRelativeVerticalPositionMargin; midRightText.Top = (float)Word.WdShapePosition.wdShapeCenter; midRightText.Left = (float)480; Including auto-generated page numbers in the Footer is yet another useful feature which can be simulated in the code. //SETTING THE FOCUES ON THE PAGE FOOTER oWord.ActiveWindow.ActivePane.View.SeekView = Word.WdSeekView.wdSeekCurrentPageFooter;
//ENTERING A PARAGRAPH BREAK "ENTER" oWord.Selection.TypeParagraph();
String docNumber = "1"; String revisionNumber = "0";
//INSERTING THE PAGE NUMBERS CENTRALLY ALIGNED IN THE PAGE FOOTER oWord.Selection.Paragraphs.Alignment = Word.WdParagraphAlignment.wdAlignParagraphLeft; oWord.ActiveWindow.Selection.Font.Name = "Arial"; oWord.ActiveWindow.Selection.Font.Size = 8; oWord.ActiveWindow.Selection.TypeText("Document #: " + docNumber + " - Revision #: " + revisionNumber);
//INSERTING TAB CHARACTERS oWord.ActiveWindow.Selection.TypeText("\t"); oWord.ActiveWindow.Selection.TypeText("\t");
oWord.ActiveWindow.Selection.TypeText("Page "); Object CurrentPage = Word.WdFieldType.wdFieldPage; oWord.ActiveWindow.Selection.Fields.Add(oWord.Selection.Range, ref CurrentPage, ref oMissing, ref oMissing); oWord.ActiveWindow.Selection.TypeText(" of "); Object TotalPages = Word.WdFieldType.wdFieldNumPages; oWord.ActiveWindow.Selection.Fields.Add(oWord.Selection.Range, ref TotalPages, ref oMissing, ref oMissing);
//SETTING FOCUES BACK TO DOCUMENT oWord.ActiveWindow.ActivePane.View.SeekView = Word.WdSeekView.wdSeekMainDocument; This is equivalent to hitting the enter button in the document. oWord.Selection.TypeParagraph(); All the text formatting options available in the Word Application can also be replicated through automation. oWord.Selection.Font.Bold = 1; oWord.Selection.Font.Color = Word.WdColor.wdColorAqua; oWord.Selection.Font.Italic = 1; oWord.Selection.Font.Underline = Word.WdUnderline.wdUnderlineDashHeavy; When the Formatting is applied to a selection, then the same formatting gets carried on to the next lines, in order to clear the formatting, the next line needs to be selected and ClearFormatting() method needs to be called. oWord.Selection.ClearFormatting(); Table of Contents is very handy when it comes to official documents or some technical papers which span across many pages. Table of contents can be inserted and updated on the fly as the document gets built.
For the Table of Contents to get auto generated without any hassles, it is vital that the Headings, Sub-Headings and the Body text have their respective attributes set. When we work on the application, the values get set by themselves, we only need to edit if required. But while programming its mandatory that we set the values in the code in order to prevent any anomalies when the Table of Contents gets updated.
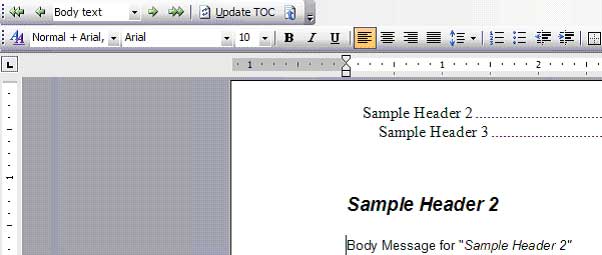
Below is an example of a document which was programmatically generated.
It is apparent that the Header 2 and Header 3 and Body are formatted differently and even in the Table of Contents the Header 2 is slightly offset from the Header 1. Open the above document and Outlining Tool bar, View -> Toolbars -> Outlining. And on moving the cursor on the Sample Header 2, we can see that the Format is Heading 2 and Outlining level is Level 2.
And for Body, the Format is
For setting the Format of the Selection, select the entire text (select between bookmarks like mentioned before in Selection section) and set the value //SELECT THE CONTENST TO BE FORMATTED AND SET THE VALUE
Object styleHeading2 = "Heading 2"; Object styleHeading3 = "Heading 3";
oWord.Selection.Range.set_Style(ref styleHeading2); oWord.Selection.Range.set_Style(ref styleHeading3);
For setting the outline level, select the contents and set it to one of the values mentioned below //SELECT THE CONTENTS WHOSE OUTLINE LEVEL NEEDS TO BE CHANGED AND //SET THE VALUE
oWord.Selection.Paragraphs.OutlineLevel =Word.WdOutlineLevel.wdOutlineLevel2; oWord.Selection.Paragraphs.OutlineLevel = Word.WdOutlineLevel.wdOutlineLevel3; oWord.Selection.Paragraphs.OutlineLevel = Word.WdOutlineLevel.wdOutlineLevelBodyText; Once the Outline Levels & Section Style are set, the Table of Contents can be inserted programmatically and the page numbers gets populated automatically based on the Outline Levels & Section Style set by the user. (Also refer this MSDN Link)
// CONTENTS NEEDS TO BE ADDED Object oBookmarkTOC = "Bookmark_TOC";
// SETTING THE RANGE AT THE BOOKMARK Word.Range rngTOC = oWordDoc.Bookmarks.get_Item(ref oBookmarkTOC).Range;
// SELECTING THE rngTOC.Select();
// INCLUDING THE TABLE OF CONTENTS Object oUpperHeadingLevel = "1"; Object oLowerHeadingLevel = "3"; Object oTOCTableID = "TableOfContents"; oWordDoc.TablesOfContents.Add(rngTOC, ref oTrue, ref oUpperHeadingLevel, ref oLowerHeadingLevel,ref oMissing, ref oTOCTableID, ref oTrue, ref oTrue, ref oMissing, ref oTrue, ref oTrue, ref oTrue); Usually the Table of Contents is inserted in the beginning of the document generation and once all the contents are populated, the locations of the Headings and Sub Headings tend to change. If the Table of Contents is not updated, then its contents points to different pages. To overcome this hassle, the Table of Contents needs to be updated at the end of the Automation. oWordDoc.TablesOfContents[1].Update();
//UPDATING THE TABLE OF CONTENTS oWordDoc.TablesOfContents[1].UpdatePageNumbers();
//THE LOCATION WHERE THE FILE NEEDS TO BE SAVED Object oSaveAsFile = (Object)"C:\\SampleDoc.doc";
oWordDoc.SaveAs(ref oSaveAsFile, ref oMissing, ref oMissing, ref oMissing, ref oMissing, ref oMissing,ref oMissing, ref oMissing, ref oMissing, ref oMissing, ref oMissing, ref oMissing, ref oMissing, ref oMissing, ref oMissing, ref oMissing); //CLOSING THE FILE oWordDoc.Close(ref oFalse, ref oMissing, ref oMissing);
//QUITTING THE APPLICATION oWord.Quit(ref oMissing, ref oMissing, ref oMissing); The Open () method which we use in Word2003 dll might throw an exception if the client have another version of word installed in their machine. If the client has Word 2002, then he has to open a word file only by Open2002 () method. Open () method which comes for Word 2003 might through an exception in Word 2002 environment. And for Word 2000, there is a method called Open2000 () and Open2002 () for Office 2002 and so on. So it is wise to put the Open () in a try-catch block as mentioned below. 14. Tips for Word Automation to Create New Document (Non-Base Template Approach)When we proceed to create a New Document without using the Base Template, the most useful entity is the inbuilt Bookmark endofdoc. It would be a build-from-scratch approach where the programmer starts of the automation by inserting his first section of contents, then setting the range to point to the endofdoc Bookmark and selecting it and inserting his contents and again selecting the endofdoc which would be pointing to the end of the document which would now be after the two sections.
|